An STL (STereoLithography) file is the most widely used file format in 3D printing. It describes the surface geometry of a 3D object using a mesh of triangles, without any color or texture information. Whether you are a beginner downloading your first model or an experienced designer exporting from CAD software, understanding STL files is essential for successful 3D printing.
What is an STL File?
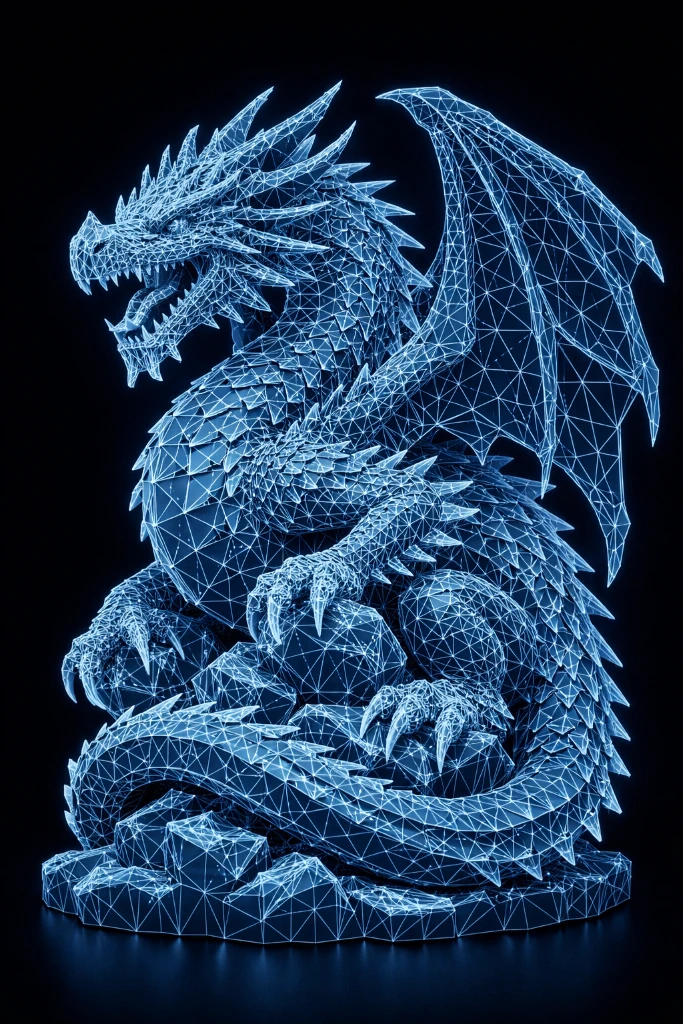
STL files are made up of thousands of small triangles that together form the surface of a 3D model. These triangles, also called facets or polygons, define every curve and edge of the object. The more triangles a model has, the smoother and more detailed its surface will appear when printed.
STL stands for STereoLithography, named after the SLA printing process it was originally developed for by 3D Systems in 1987. Today, despite being over 35 years old, it remains the industry standard format supported by virtually every slicer and 3D printer on the market.
STL File Types: ASCII vs Binary
STL files come in two variants:
- ASCII STL – Human-readable text format. Larger file size but can be opened and inspected in a text editor.
- Binary STL – Compact binary format. Much smaller file size and faster to process. Recommended for large models.
Most 3D modeling software exports binary STL by default, which is the better choice for 3D printing workflows.
How to Use STL Files for 3D Printing
To print an STL file, you need to import it into a slicer software such as Cura, Chitubox, or Lychee. The slicer converts the STL into G-code instructions that your 3D printer can understand and execute layer by layer.
Step-by-Step Workflow
- Download or create your STL file – Source files from platforms like Thingiverse, MyMiniFactory, or design your own in Blender or Fusion 360
- Open in slicer software – Import the STL into Cura (FDM) or Chitubox (resin)
- Check scale and orientation – Ensure the model is the correct size and positioned for minimum supports
- Configure print settings – Set layer height, infill, supports, and speed
- Slice and export – Generate G-code and transfer to your printer via USB, SD card, or WiFi
- Print – Start the print and monitor the first few layers
Common STL File Problems and How to Fix Them
Not all STL files are print-ready. Here are the most common issues and solutions:
- Non-manifold geometry – Holes or gaps in the mesh. Fix with Meshmixer or Microsoft 3D Builder’s auto-repair feature
- Inverted normals – Triangles facing the wrong direction, causing the slicer to misinterpret the model. Fix in Blender or Meshmixer
- Overlapping geometry – Parts intersecting each other. Merge with boolean operations in your modeling software
- File too large – Very high-polygon models can slow down slicing. Reduce polygon count with Decimate modifier in Blender
Tips for Good STL Files
- Make sure the model is watertight (no holes in the mesh) before slicing
- Check the scale before slicing – a model exported in millimeters may appear tiny if your slicer expects centimeters
- Use repair tools if the file has errors – Cura has a built-in repair function
- Keep wall thickness above 1.2mm for FDM printing to ensure structural integrity
- Avoid overhangs greater than 45° without support structures
Where to Find Quality STL Files
The best sources for free and premium STL files include dedicated 3D printing communities and marketplaces. Always check that files are rated well and have been tested by other users before printing.
For more guides, visit the SANIX3D Blog or explore our Slicer guides to learn how to prepare your STL files for printing.