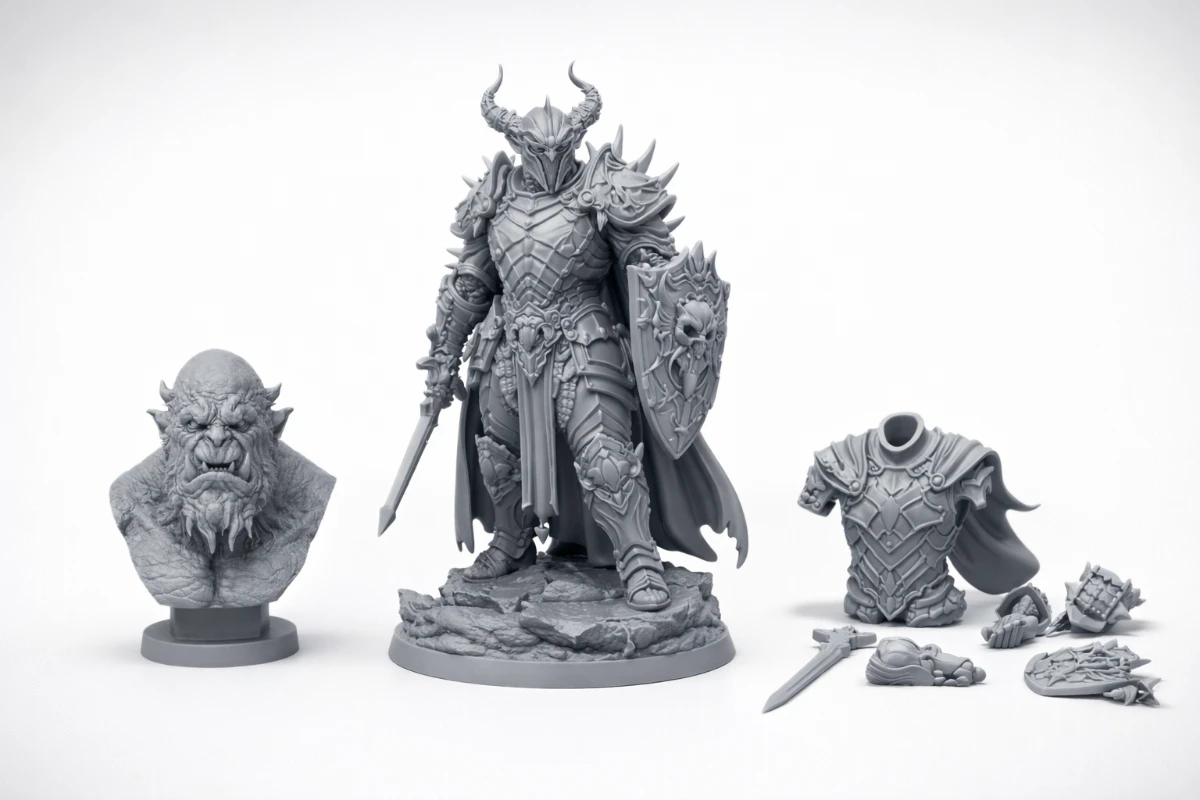
From a 3D printing perspective, the physical complexity of printing a bust, a full figure, or a figure that has been separated into individual parts varies significantly. Understanding these differences will help you choose the right approach and avoid costly print failures.
Why Print Complexity Matters
Every 3D print faces challenges based on geometry: overhangs require supports, tall thin structures can topple, large flat surfaces cause warping, and long print times increase the chance of failure. The form of what you’re printing — bust, full figure, or separated parts — dramatically affects all of these factors.
Printing a Bust
Busts are the most approachable form to print for several reasons. Their compact shape typically fits well on most build plates, requires moderate support structures mainly for the chin and nose area, and completes in a reasonable time frame.
Typical Challenges with Busts
- Underside of the chin and nose require careful support placement
- Hair details may need careful orientation to print cleanly
- Fine facial details benefit from resin printing over FDM
Recommended Settings for Busts
- FDM: 0.1–0.15mm layer height, tree supports at 45°, print face-forward
- Resin: Standard settings, orient at 30–45° angle, medium supports on face details
Printing a Full Figure (Unseparated)
A full figure presents significantly more printing challenges. Outstretched arms, thin legs, and complex accessories create numerous overhangs and fragile sections. Print height may exceed many printers’ build volumes, and long print times (12–24+ hours for FDM) increase the risk of failures.
Challenges with Full Figures
- Arms, especially horizontal ones, require heavy support structures that leave marks on the surface
- Thin elements like swords, spears, and fingers are fragile and prone to breaking during printing or post-processing
- Large surface areas on robes and cloaks can cause warping in FDM
- Very tall figures may not fit on standard build plates
Printing a Figure in Separated Parts
Cutting a figure into parts before printing is the professional approach used by miniature manufacturers and serious hobbyists. Each component is designed to print optimally — arms print flat to avoid supports, the torso prints upright, the head prints separately for best detail.
Advantages of Printing in Parts
- Fewer supports needed – Each part can be oriented to minimize overhangs
- Better surface quality – Less post-processing to remove support marks
- Easier painting – Paint individual pieces before assembly for better access to recessed areas
- Fits larger scales – Print at 200–300% scale by separating into printable sections
- Reprint individual parts – If one arm breaks, reprint just that piece
Best Tools for Cutting Models into Parts
- Meshmixer – Free, easy plane cut tool
- Blender – Most flexible, allows complex cuts with boolean operations
- Chitubox / Lychee – Built-in cut tools for resin slicers
Our Recommendation
- Beginners: Start with busts — lower risk, faster iteration, great learning experience
- Intermediate: Try full figures with tree supports in Cura or Chitubox
- Advanced: Cut into parts for best results, especially at larger scales
Learn how to cut STL files: Cutting the STL File – Complete Guide.